


Review: Antelope Audio Zen Studio
Antelope Audio has released the most flexible USB audio interface on the market, but can you get a handle on it?
By Mark Davie
19 September 2014
When images first surfaced of Antelope Audio’s Zen Studio, the most talked about feature was its handle. The single, fire engine-red piece of bent metal really caused quite a stir. A lot of people thought designing an interface that looked like it would fit into a rack means it should actually fit into a rack (sure enough, I’m reliably informed that Antelope is developing a rackmount kit that leaves 1U space above to ensure the Zen Studio stays cool). As useful and as intriguing as the handle is and was, it’s still a ballsy move on the part of Antelope. Yes, portability is a huge asset, but there are many people who would prefer to squirrel this baby away.
But here it is, and the Zen Studio hasn’t changed from those initial shots one bit, handle and all.
The other main arguments for keeping the Zen sans rack ears are related to the device’s high I/O count. Firstly, it gets a little warm, so Antelope has designed ventilation into the top and bottom of the unit, with some elevating rubber feet to let it breathe. Secondly, the four ADAT expansion ports are on the short end opposite the handle, so you’d have to incorporate some right angle adaptors if you wanted to use them in a rack.
In summary: the Zen is designed to cater for the kind of recording a lot more people are doing these days. Namely, capturing ‘out in the field’ — practise room, church hall, club, whatever — and heading home to mix.
MEDITATE ON THIS
The idea is the Zen Studio packs in everything you need to record most projects, and the ability to expand when it doesn’t. There are a total of 38 possible inputs, and 32 possible outputs, and all are simultaneously available. Available in the sense you can mix them using the Zen’s software control panel and onboard DSP. When it comes to recording, Antelope’s USB chip provides 24 I/O, without sacrificing any channels to go higher in sample rate — a common issue with other interfaces — all the way up to 24-bit/192k.
The USB drivers and chips are exactly the same ones Antelope uses in the Orion32, which can handle 32 I/O over USB at 192k, so if anything, the Zen should prove more stable.
On my 2.6GHz i7 Macbook Pro it hasn’t skipped a beat. Set up was painless, and there haven’t been any idiosyncratic annoyances like having to power up my computer and devices in a certain order, which can be painful sometimes. And letting it fall into Sleep mode and jolting it awake made no difference to the Zen Studio — it just meditates while waiting for your next move.
PREAMP CAMP
There are a total of 20 analogue inputs on the Zen Studio. There are 12 combo jacks — four on the front that have a three-way function: DI, mic or line; and eight on the rear that are switchable between mic or line. The other eight analogue line inputs are available on a D-Sub connector. 12 preamps will go a long way for a lot of situations, but it’s also a lot to pack into an almost single-height rack unit along with all those other inputs and outputs. So what’s the trick?
The Zen Studio uses the same Burr-Brown PGA2500 preamp chip as Universal Audio’s Apollo, Apogee Duet, Prismsound Orpheus, MOTU 828mkIII, RME Fireface 400, and plenty more. And like the rest, the digitally-controlled preamp has a flat, even response, with a gain range of 55dB from 10dB to 65dB. Obviously, there’s variation in implementation, but the basic gist remains the same, and Antelope definitely hasn’t throttled its performance in the Zen.
I don’t mind these pres at all, using them on the Apollo Twin was fine — good clean gain — likewise here. Obviously you don’t get the special sauce of Apollo’s Unison preamp modelling on the way in. Though interestingly, because both units use the same preamp, when using the Zen you can insert the Unison models in your DAW and achieve some similar harmonic effects, albeit without the same gain-staging.
Fitting so much into an almost 1U space requires a bit of digital fandangery and a reduction in physical controls. In the Zen’s case, there’s one major dial and three buttons on the whole device, control is essentially deferred to the software Control Panel. Most users won’t be perturbed by the inability to adjust gains on the front panel, but you might find these soft controls takes away one of the few tactile operations left.
NEED TO KNOW
Antelope Audio Zen Studio
USB Audio Interface


DIGITAL DIVINATIONS
The digital preamp control does allow for some nice features. For instance, the gain tracking is very solid, and you can stereo link consecutive channels; fixed as odd numbers on left, even numbers on right, so you’ll have to plan your channel assignments early.
There are a few options that are about to land that are worth noting. Along with the 55dB of gain, the PGA2500 also has a unity gain feature (about to be implemented), while a pad and output trim will also be on the final incarnation. Antelope has been working on techniques to switch to digital gain at lower levels to give users control down low, then kick back into analogue gain for the higher levels — hence this feature not being on the review unit.
CONVERSION FROM THE STARS
The Zen Studio has the exact same converters, clock and USB chips as the much-heralded Orion32, the only thing it misses out on is a 10M atomic clock input. The 10M would be complete overkill for the Zen anyway, and besides it has one of the best internal clocks going.
All the standard clock sources are available: internal Oven clock, ADAT, S/PDIF and word clock. Also, when you start up a DAW, the clock source and sample rate greys out and locks to USB. Essentially, this still clocks to the internal oven-controlled clock, it just means all the sample rate control is handed over to your DAW so you can’t set conflicting rates in the Control Panel. For more insight into the clocking technology and quality of conversion, search for Andrew Bencina’s review of the Orion32 on www.audiotechnology.com.au. Andrew describes the Orion32 as a ‘fine AD/DA converter with unique characteristics’ and would extend that description to the Zen. In use, the Zen Studio sounded great. The outputs are really clear, there was no discernible noise introduced into my monitoring system at any level. The same can’t be said of a lot of audio interfaces. The dual headphone amps are also clear and don’t go exceedingly loud, which is a good thing for protecting your ears.
One thing I would have liked to see is separate knobs for headphone levels. There are two ways of accessing them, one is by clicking through outputs on the main dial till you get the one you want to adjust, or doing it on the software Control Panel. But I like having quick hardware control over the levels feeding my ears, especially if a computer freaks out and starts trying to deafen me. Leaving the main dial for monitor level and adding two for headphones would have been useful. Thankfully, when you press and hold the volume knob you mute the output you are currently controlling, which is a useful feature.
On the input side, while the 12 combo inputs use a differential amp to handle the varying levels presented to it, the D-Sub line inputs use an alternate amp feeding the AD conversion stage. You also get more control over line levels on the combo inputs, with a range of -6 to +20dB, while the D-Sub inputs range from -6 to +12dB. Whether line inputs do or don’t bypass onboard preamps is a big concern for some. But in practise, there didn’t seem to be any difference between using a line input on either the combo or D-Sub inputs. When feeding the same signal through each, they almost completely nulled, and what was left seemed like the result of a minute gain matching issue, not any tonal difference.
there’s a stupid amount of I/O for any 1U-ish audio interface, let alone a portable one


CONTROL PANEL
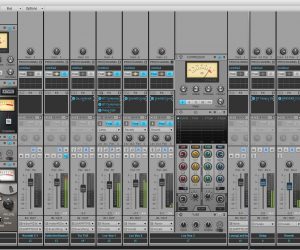
The software Control Panel is a real pleasure to use, despite being unfamiliar at first. The Routing tab is split into ‘From’ and ‘To’ sections where you can route any input to any output or mix, with colour coding to help you keep track of what’s going where. Once I got the hang of dragging around single channels or groups, I felt it was actually much easier to manage than a typical matrix, which would have to be incredibly wide to incorporate the same flexibility.
Using this method you can easily see what is feeding your monitoring systems, and each of your four onboard mixes; what you’re routing through the onboard DSP effects; which channels or mixes you’re recording; and what’s feeding your ADAT outputs.
As I was saying earlier, you can record up to 24 channels at a time. But if you were doing a live recording and needed more inputs in a pinch, you could premix some tracks together in the internal mixer and make use of all 38 inputs. Alternatively, you can use the mix engine to create four ultra-low latency, 32-channel monitor mixes, with up to 16 freely routable channel strips that include a five-band EQ and compressor section. The negligible latency of the monitor mixers are really handy for tracking. Because when using ProTools, I was getting a consistent round trip latency of 5.4ms — plus double whatever buffer I was using at the time — so reducing the latency was necessary for accurate monitoring. The onboard DSP effects are quite good, and more than enough for crafting monitor mixes. Some might lament the omission of reverb and delay, but setting up a pre-fade aux in your DAW with the effect on it will work just fine. And adding more effects to its DSP quiver is another area Antelope plans to work on in the future [Antelope, as of going to press, give the reverb a couple of weeks before it’s released — Ed.] .
The Meters tab is likewise comprehensive, you can meter all your inputs and outputs by selecting them from a drop-down menu. And whatever group you select is reflected on the hardware unit’s meters. There’s provision for up to 32 meters on any one screen, so it would be nice to have logical collections of meters to make use of that space. As it stands, the 12 preamps and eight line inputs are split across two different screens — it would be handy to view them all at once.
One downside is there’s no MIDI on the unit. This is becoming more of a theme with audio interfaces, which I find a little annoying given my controller keyboard is an old Korg M1. Maybe it’s time for me to move into the future of MIDI over USB.
GETTING AROUND
Oddly enough, the handle is really the Zen Studio’s only potential turnoff. Without it, and with the ADAT ports relocated, I think it could have been more of a no-brainer for anyone on the interface hunt. It’s not that I don’t like the handle, there are plenty of ways I could imagine integrating the device into my setup in a more permanent way, and a mobile interface is always useful. But having the ADAT ports on the end does make them a bit prone to having their caps snapped off when carting it around. Which is the whole idea of the interface, to keep it portable. Keeping with the portability theme, I’d almost rather have the ADAT ports shielded by the handle.
The Zen Studio really is an impressive device though. The clocking and conversion is supreme, the pres are nice and clean, and there’s a stupid amount of I/O for any 1U-ish audio interface, let alone a portable one. For anyone that needs loads of I/O and has an ear for quality conversion, the Zen Studio can put a peaceful end to your search.


RESPONSES